
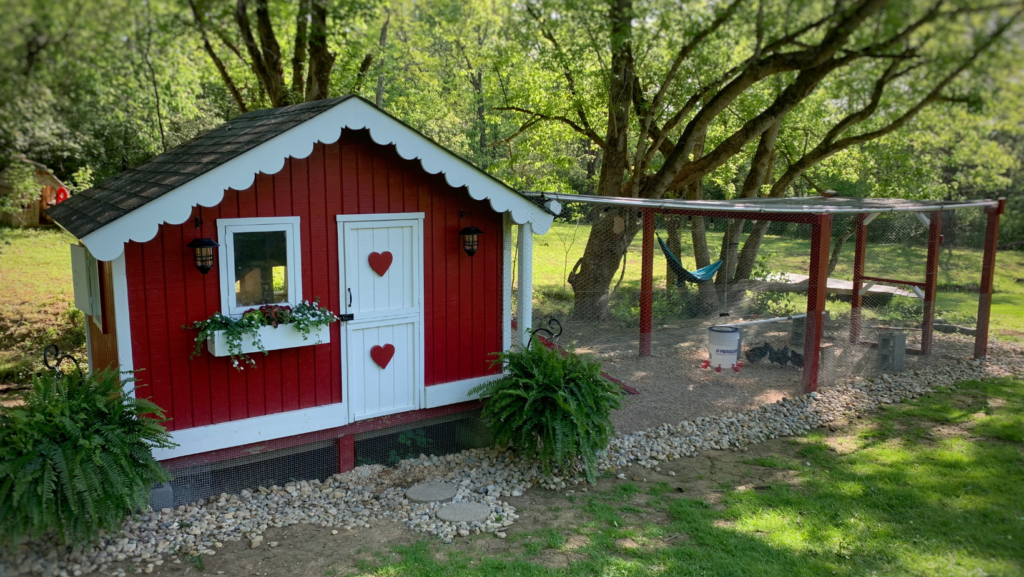
Repurposed Playhouse Turned into a Chicken Coop
When we decided we wanted to get chickens, we realized how expensive coops can be. Like so expensive! We knew it would be cheaper to build one ourselves. But then, my mom had such a great idea to turn an old playhouse, that was on our property when we moved in, into a chicken coop. And we were thrilled with the results!
Knowing that building a coop is expensive, we expected to throw a few hundred dollars into it, plus we needed a chicken run. As much as we’d like to let our ladies free range all day, we’re pretty limited because of the multitude of predators in our area. The ladies do free range, but only when we’re outside with them. Which luckily for them, is pretty often.
Repurposing this little old playhouse saved us a lot in the long run, since we didn’t have to buy all of the lumber and supplies to build from scratch. To be honest, the most expensive part of building our coop was the poultry netting and hardware cloth.
Turning an old playhouse into a hen house for our feathered ladies was a super cost effective and fun decision. We feel like it looks super cute and is a sturdy and comfortable home for our girls. Below I’ve included all of the details of our build.
Making adjustments to turn the playhouse into a coop
We began with the playhouse. It was sitting on the ground and needed to be raised a bit to provide some space underneath to give the chickens more room and for security. First, we leveled the area. Then my husband got super creative and used a car jack to lift the coop corner by corner and placed it up on cinder blocks. Then he placed kickers and extra support to keep things in place.

Building the chicken run
The chicken run was a fun and intense process. We fought tons of rain and found out the area we were using for our coop was a little muddy. More on how we combatted that later. My husband plotted our area for the run and dug the holes for the posts. Meanwhile, my dad built a roof for us with steel pipe and leftover tin roof from one of his previous projects. This gave us a sheltered area for the ladies. Then we began piecing everything together. We attached the roof to the posts and then the most difficult and time consuming part began. Predator proofing the coop and run.
Predator proofing the chicken coop and run
We knew that we wanted to fence the entire area in with poultry netting and the bottom half with a layer of hardware cloth on top of the netting. This was important because raccoons and other small predators can grab chickens through the poultry netting. We also knew we wanted to bury the hardware cloth to keep any digging predators from getting in. So we began the process of digging and digging and digging. Did I mention we did a lot of digging? Our shoulders and backs were so exhausted from this process, but it was so worth it!


We dug about 16 inches deep and a foot wide around the entire coop and run. Then we placed the poultry netting and then tie wired and nailed the hardware cloth around the entire bottom and down into the trench. Once we had all of the fencing in place we began filling the trench with heavy materials we found around our property. We used lots of large river rocks and broken bricks. Then we filled the trench with the dirt we had dug out. Once we had everything leveled again, we placed golf ball size decorative rock all around the coop and chicken run. Doing this lengthy process was so worth it! We haven’t had any creatures big or small break into the coop or the run.
The nesting box
We knew we wanted a decent size nesting box with multiple boxes for our 25 hens. A good rule of thumb is about 4-5 hens to a nesting box. But we also didn’t want to take away from any interior space since we knew we were working with a smaller building. So we built the nesting box out of the coop. To be honest, this was probably the part we dreaded the most. We were terrified to cut a giant hole into the playhouse just in case we made a big mistake. But, we put on our work boots and got to it. And to our surprise, it went so well!
The first thing we did was determine the size we needed for the 6 nesting boxes. We cut out the hole and then my husband built the frame with 2×4’s and plywood. We inserted the nesting box frame and attached it to the coop. Then we weather proofed it. We used caulk around the seam, built a slanted roof, attached shingles and the door. We were so happy with the results!


The finishing touches
Once the actual coop and run were built and predator proof, we got to focus on the “fun things”. We made our own feeder and waterer, determined what bedding we wanted to use inside the coop and hung lots of perch bars. We also added some trim and gave the coop a fresh coat of paint. My eldest son made me a flower box for Mother’s Day (with daddy’s help of course). And then we got to introduce the ladies to their new home. That was so fun!
I mentioned before that we battled some major mud and water issues while we built the coop. We were worried that the run would be muddy all the time. I am happy to report that we haven’t had any issues with the run being too wet!
We used medium flake pine shavings inside of the coop after sprinkling a healthy amount of baking soda on the floor of the coop. We decided to go with the deep litter method for easy maintenance and some amazing compost for our gardens. You can read more on the deep litter method here. Now for the run, we used pine bedding pellets as a base layer and have also recently started adding pine shavings to the run as well. It has kept things nice and dry and easy to clean!


The finished coop
We are so happy with the finished coop! If you have an old playhouse, shed, barn or other type of building, I encourage you to try to get creative for your coop. It really did save lots of time and money in the long run and we are so thrilled with how everything turned out.


